

If you feel that it’s time to create your own create space to do what you love, read on. I’d like to share my story about converting my garage into the art studio of my dreams to help inspire you to make your own creative space. There’s nothing wrong with using a corner of a room. I did this for many years. But if your looking for a larger, more private and adaptable space, your garage may be the perfect option. Below I list the steps I took to make my dream become a reality as well as highlighting the problems I encountered to help you avoid the same setbacks.

“Mellow Shores”, 24″x36″ encaustic on wood panel
I had been tossing around the idea of creating a serious studio space for a long time. The days of cramming my supplies and worktable in a corner of a room were coming to an end. I desired real space to work on big encaustic paintings, teach classes and take my art career to the next level. (Click HERE to see my latest art). To give me added motivation, I signed up to participate in a local artist’s tour that required a studio where the public could view artwork.
The idea of an Amish shed was appealing because of its customization. However, when the quote came in with all of my “must haves”, it became clear that this idea was out of reach. The best price in my area was around $18,000 for a 24’x 14′ shed with all the bells and whistles. That price didn’t even include the cost of electricity hook up and installing heating and cooling!
Discouraged about the price tag, a light bulb went off. Literally. I walked into our double-bay garage, turned on the light, and saw the vision! Sure it needed work; a new coat of paint, a new floor, a new garage door, a hanging and shelving system and heat/ air conditioning unit. At least the previous owner had already installed a sink, cabinets, ceiling lights, and five windows that gave the space enough natural lighting. It was everything I needed, and more. Yes, it took some time to sell the idea to my husband who wanted to keep it as a garage. I told him that it will be MY car that is stuck out in the snow, but this was a small inconvenience I’d gladly endure to have the luxury of my own creative space.
Here is a week-by-week run down describing what was done to convert the garage to an art studio to give you a better idea of how to plan for the project.
Week One
- Painting contractor visited and submitted his proposal — approximately $4K to lay an epoxy floor; patch, paint and add molding to the walls for the entire 4-bay garage. I think it’s safe to assume, you can cut this price in half for a two-bay garage area.
- Move out all the stuff (TIP: Plan this huge task when the weather is dry. Virginia decided to have a wet spring and our stuff still got soaked under tarps!)
Week Two
- Power wash garages
- Epoxy applied on top of the concrete flooring (You won’t be able to use this space for several days to allow the layers to dry.)
Week Three
- Patching, painting, adding floorboards to help fill in the gap between the wall and concrete floor
Week Four
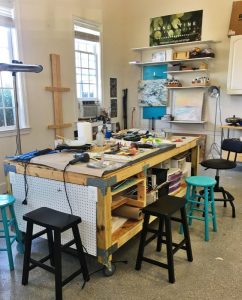
- Receive my awesome work table built by a good friend of mine.
- Purchase and install shelving (I used Rubbermaid FastTrack system in white. See link below.)
- Purchase and install gallery hanging system (I used STAS Gallery Hanging System. See link below.)
Week Five
- Purchase and install air conditioner (TIP: check ahead of time to make sure a dedicated circuit is located close to a window. To add a new circuit can cost up to $500! Using an extension cord is not recommended. I bought the large LG unit to adequately cool the 425 sq. foot space.)
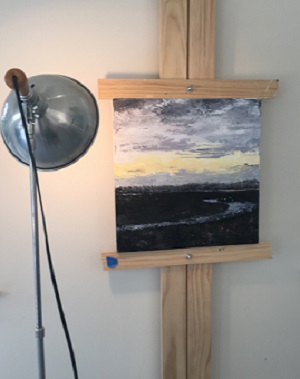
- Installed a DIY wall easel.
Week Six
- Opening Event!! I scheduled an Open Studio event several days before a big local art tour to give patrons a chance to preview and purchase my work before the show.
Project Photo Gallery
-
-
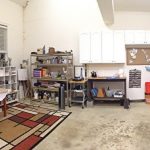
- before the reno
-
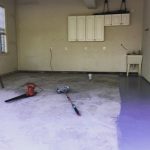
- prepping the floors
-

- floor epoxy
-
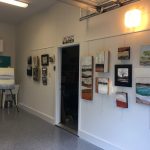
- gallery system hung
-
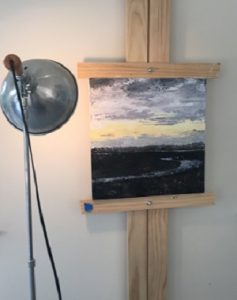
- DYI easel installed
-
- Ready to teach my first class!
-

ADDITIONAL ITEMS TO CONSIDER
HEAT IS AN ISSUE
Be aware that heat is a major issue when working in a garage. Using a portable radiator heater and a portable infrared heater was not enough to keep warm during Virginia winters. Most of the heaters on the market have an exposed flame and having solvents of any kind near the heater could be dangerous. Since I use solvents all the time in my work, I needed a safe option. I found that an electric heater worked best for my needs – Fahrenheat FUH Electric Heater for Garage!! It was easy to install on a dedicated circuit, and the thermostat function keeps the space’s temperature above 50 degrees on cold Virginia nights. I sometimes add a small area heater if needed. When researching heaters, make sure to check if they need a dedicated circuit to work safely before you buy.
LIGHTING IS CRUCIAL
If you are using the studio as a space to create artwork, the right lighting is crucial. My garage came with five florescent lights that seemed adequate at first. After further research, I learned that it is very important to have your lighting as close to daylight as possible. I saw a huge difference in color representation once I switched the florescent lightbulbs to 5000 lumens (daylight). There are abundant articles online about the details of lighting which I recommend you take the time to research before investing in an expensive lighting system. I installed Sunco lighting 5000K daylight fixtures. and they work great!
GARAGE DOOR FIASCO
This might sound strange, but I experienced a weird wind vortex one evening during a violent rain storm in the studio. The gale wind that had come through a partially opened window created such force that it sucked the garage door in like a tin can and bent its railings! Papers were flying everywhere as I rushed to close the window to stop the mini tornado! Unfortunately, the door was beyond repair and I had it replaced. The new door is highly insulated and hopefully will hold during our Virginia storms. I worked with Home Depot to find the perfect doors for my needs.
EXHAUST FANS
As I mentioned earlier, I use many solvent type materials in creating my encaustic wax paintings. To stay on the safe side, I ordered an exhaust system specially created for encaustic studios. The Vent-A-Fume Encaustic Fume Extractor from Vent-A-Kiln was easy to install in a window and runs off a normal circuit with no need for a special power source. Now, I don’t have to wear a ventilation mask to avoid toxic fumes in the studio. This fan is also highly recommended for oil painters as well.)

Teaching encaustic painting in my studio.
Even with the rain and some contractor delays, the process went smoothly and I couldn’t be more pleased with the finished product. I’m able to work any time of the day with my 30 second commute (usually in pajamas). The convenience of being able to hold workshops in my own home can’t be beat. I honestly don’t think I’ll ever need another creative space.
Converting a garage can be as simple or as extravagant as you wish, and with a little planning and patience, your dream of having your very own creative space can come true.
Feel free to reach out to me with any questions about the studio. I’m happy to help you along your way to creating your perfect creative space!
If you would like to view my encaustic work and learn more about me, click here for my website.
Please leave a comment of your experience building a creative space. I’d love to see it! You can follow me on Instagram at https://www.instagram.com/annestinefineart. I also send out a “New Art” email and newsletter each month — sign up HERE.

Click the image above to watch my painting process.


Thank you! My friends and I are planning to build an art studio and attempt at a small business out of our garage. I didn’t consider redoing the floors!
You’re welcome! Good luck!
You’ve done an amazing job. We recently had a new garage door fitted as we were nearing completion of refurbishing our 5 bed Edwardian home after our youngest (27) moved out. I’ve been looking forward to our single story bungalow, with garden and art shed to relax and get creative without causing any mess in our new home.
Then Corona virus happened. We are fortunate to live on the Isle of Man and our Government closed our borders immediately. The problem we found was so many people from around the world were buying properties on our island (all bought virtually as they couldn’t get in) that the bungalows that came on the market were sold before we could view them.
We know that we would have no problem selling our beautiful home but just cannot find anywhere to buy.
So my husband came up with a solution. If I agreed to forget about selling (he never wanted to move), then he would convert our garage into my own art and crafting studio. After thinking about it for a few days, I agreed.
We are due to start the conversion in the next couple of weeks and I’m super excited. I finally get my own space and not worry that paint, spray or glue is splattering on bedroom walls of carpets. I currently am down to two bedrooms that I use after having a huge sort out.
You’ve inspired me to get started sooner so I’ll be in the garage clearing out tomorrow. I’m not a professional artist but like you I will be advertising my work for people to come and view and hopefully buy it if a piece takes they’re fancy. iIt will just be nice to have somewhere to call my own for the next couple of years until we decide to sell again after things slow down 😊.
Stay safe and well and thanks for posting your artical, Sharon x
Congrats Sharon!! You’ve made a big step towards following your dreams, and I applaud you! You inspired me to update the article with a few more points to help you along your way. Please take a look. Keep me posted on your progress. Good luck.
Do you need insurance to have people come to view your art , or to teach them on your premises?
Thank you for your question. I have home owner’s insurance and an umbrella policy which covers any injury, etc, that may occur on the property.
Thank you so much for sharing your journey and your art is absolutely beautiful! I wish I lived near you and could take a class with you. I finally have a home with a two car garage and beyond ecstatic there, though also trying to decide on ways to make it more of an inspiring art studio. The floor is some thing I’m trying to decide on and I would like to know your experience of making this decision. I love the look of Epoxy garage floors. Very striking! However, I have a knee that doesn’t always like me to be on hard surfaces. I’m also wondering if the Epoxy is likely to outgas harmful chemicals. Thus, I am considering the rubber options.Curious if you have any thoughts on the topic. Thanks again for sharing your journey and your art!
Hi Clare. Thank you for your kind words and for your question. It was important to me to find a floor option that was durable and easy to clean, and that could be applied to our other bay where we park the cars. I’m constantly spilling and dropping encaustic wax on the floor and have to scrape it up with a blade. There are rubber mats you can buy to stand on too. I’m considering one myself. I’m not familiar with the problem of epoxy floors emitting harmful fumes. ??? Hope this helps and good luck. :)
Very nice ideas and tips. My daughter is very interested in making a work studio for her art work in her garage. She really liked the art table that you showed in your write-up and I would like to make it for her. Did you make it yourself from plans?
Thank you for reaching out. I love my table! It was made by a friend of mine without any plans. If this helps, here are the dimensions: Height 3′, width 8′, depth 4′, two outlets installed at each end, one power supply cord, two shelves that slide out on one end, four locking wheels. Good luck! Anne